Building a Kubernetes Cluster with Raspberry Pi (Part I)
This series remained unfinished and I currently have no plans to continue it. Still, the published content may be useful.
This is the first part of a series of posts in which I explain how I built a Kubernetes cluster using Raspberry Pi. Here I present the hardware configuration that makes it up.
| Part | Title |
|---|---|
| P01 | Hardware |
| P02 | Operating System and Docker |
| P03 | K3S Cluster |
| P04 | Power Consumption |
Introduction
Kubernetes is a container orchestration technology that has been on the market for several years and is increasingly used in professional environments. However, until recently I hadn’t had the chance to work directly with it. I’ve been using Docker extensively for years and, as a natural evolution, learning Kubernetes was something I had pending. And since I firmly believe that the best way to learn is by doing, I decided to build my own cluster from scratch.
I considered deploying it in the cloud, but the amount of services, quirks, and billing models offered by different providers put me off. My goal was to learn Kubernetes, not to learn how AWS, Google Cloud, or Azure bill their services. On top of that, I’d already had some scares in the past with supposedly “free” services that turned out not to be so free. So I opted to build an on-premise cluster, even if it meant a higher initial cost and a bit more manual work.
This option allows me to focus on the fundamental concepts without being distracted by additional services, and gives me complete peace of mind: if I turn off the cluster, I’m not generating any unexpected charges.
Cluster Components
The cluster is initially composed of 5 Raspberry Pi 4B units with 8 GB of RAM each. This results in:
- 20 cores at 1.5 GHz
- 40 GB of total RAM
Each Raspberry uses a Samsung EVO Plus 32 GB microSD card, which initially serves both as the operating system storage and for container persistence. Later on, when I work with persistent volumes, I will add a dedicated storage system.
To simplify the setup and reduce the number of cables, I installed PoE HAT modules, which allow powering the Raspberry Pi boards directly through the Ethernet cable. This eliminates the need for additional USB power adapters and cables.
The network is centralized around a Netgear GS108PP PoE switch, with 8 powered ports, allowing me to connect and power up to 7 Raspberry Pi boards (one port is used to connect the switch to the rest of the network).
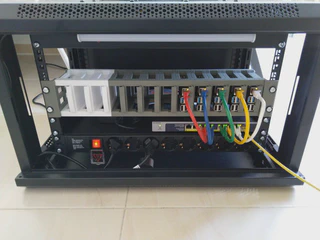
The entire setup is installed inside a 19" 6U rack cabinet (Phasak PHP 2106 model). Its layout is as follows:
- 1U for a power strip with switch
- 1U for the switch, mounted on a shelf
- 2U to host up to 12 Raspberry Pi boards
- 2U free for future expansion
To neatly arrange the Raspberry Pi boards, I used a 3D-printed project available on Thingiverse. It allows placing them on removable trays inside the rack, making maintenance much easier. Most of the solutions I had seen online stack the boards in a way that requires disassembling everything to replace one of them. This one, however, is comfortable and modular.
Before leaving the cluster running permanently, I want to measure its power consumption. My idea is to integrate the measurement into Home Assistant, which I use for home automation, so I’m still comparing compatible smart plugs or energy meters.
Conclusion
The combination of all these components results in a cluster that is:
Compact
The 19" cabinet takes up very little space and can be placed almost anywhere.
Well-ventilated
The rack includes two large top fans, and each Raspberry Pi has its own integrated fan in the PoE HAT. Cooling is more than sufficient to keep the cluster running continuously without worrying about temperature.
Neat
Using PoE greatly reduces cable clutter, keeping the installation clean and leaving more free outlets on the power strip.
Illuminated
The cabinet includes LED lighting, which makes maintenance tasks easier without needing to light up the entire room.
Extendable
Thanks to the 3D-printed mount, I can host up to 12 Raspberry Pi boards using only 2U. The remaining 2U allow me to:
- add more Raspberry Pi units
- install a UPS
- add storage
- or carry out any other future expansion
BOM (Bill of Materials)
- 5× Raspberry Pi 4B 8GB RAM
- 5× Samsung EVO Plus 32GB
- 5× PoE HAT
- 1× Netgear GS108PP
- 1× Phasak PHP 2106
- 1× Power strip with switch (8 outlets)
- 1× Rack shelf
- 1× 25 cm Ethernet cables
- 1× Rack screws and nuts
- 1× M2.5 screws for Raspberry Pi
- 2× M4 threaded rods, 1 m (hardware store)
- 8× M4 nuts (hardware store)